

| |
The Timeline organizes and controls a document's content over time in layers and frames. Like films, Flash documents divide lengths of time into frames. Layers are like multiple film strips stacked on top of one another, each containing a different image that appears on the Stage. The major components of the Timeline are layers, frames, and the playhead.
Layers in a document are listed in a column on the left side of the Timeline. Frames contained in each layer appear in a row to the right of the layer name. The Timeline header at the top of the Timeline indicates frame numbers. The playhead indicates the current frame displayed on the Stage.
The Timeline status display at the bottom of the Timeline indicates the selected frame number, the current frame rate, and the elapsed time to the current frame.
Note: When an animation is played, the actual frame rate is displayed; this may differ from the document frame rate if the computer can't display the animation quickly enough.
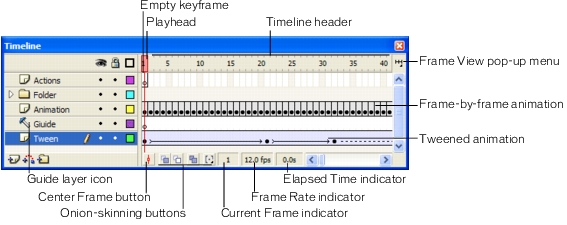
You can change the way frames are displayed in the Timeline, as well as display thumbnails of frame content in the Timeline. The Timeline shows where there is animation in a document, including frame-by-frame animation, tweened animation, and motion paths. For more information on animation, see Creating Motion.
Controls in the layers section of the Timeline let you hide, show, lock, or unlock layers, as well as display layer contents as outlines. See Editing layers and layer folders.
You can insert, delete, select, and move frames in the Timeline. You can also drag frames to a new location on the same layer or to a different layer. See Working with frames in the Timeline.
| |