Exporting FLV files from video-editing applications (Flash Professional only)
If you have Macromedia Flash MX Professional 2004 and QuickTime 6.1.1 installed on your system, you can use the FLV Export plug-in to export FLV files from supported video-editing applications. You can then import these FLV files directly into Flash for use in your Flash documents. In addition, you can dynamically play back external FLV files in Flash documents at runtime. See About playing back external FLV files dynamically.
Exporting FLV files from video-editing applications significantly streamlines the workflow in using FLV files in your Flash documents. With the FLV Export plug-in, you can select encoding options for video and audio content as you export, including frame rate, bit rate, quality, and other options. Then you can import FLV files directly into Flash without needing to re-encode the video after import. For more information on video formats and importing to Flash, see "Video Fundamentals" at www.macromedia.com/support/flash/.
The following video-editing applications are supported by the FLV Export plug-in:
- Adobe After Effects (Windows and Macintosh)
- Anystream Agility (Windows)
- Apple FinalCut Pro (Macintosh)
- Apple QuickTime Pro (Macintosh)
- Avid Xpress DV (Windows and Macintosh)
- Discreet Cleaner (Windows and Macintosh)
- Discreet Cleaner XL (Windows and Macintosh)
You can install the FLV Export plug-in after installation of Flash MX Professional 2004 is complete. The plug-in is placed in the QuickTime folder. From this location, the FLV Export plug-in is available to any application that uses QuickTime 6.1.1, even programs added after the FLV installation.
- Click the installer and follow the onscreen instructions.
When you export video from an editing application, the Flash Video (FLV) Exporter is used to set various encoding options. The Flash Video Exporter is divided into three main sections: Video, Audio, and Other. The Video section contains the encoding options for your FLV video, Audio contains the bitrate options for your MP3 audio encoding, and Other allows you to set your scaling and deinterlacing options.
- With the video open in the video-editing application, select File > Export > QuickTime.
- In the Export dialog box, under Export, select Macromedia Flash Video (FLV), and then click Options.
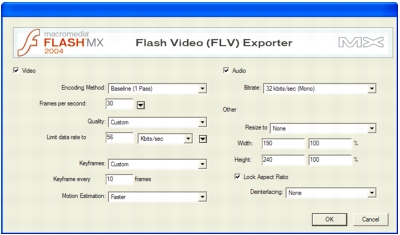
- In the Flash Video (FLV) Exporter dialog box, select an Encoding Method from the pop-up menu:
Baseline (1 Pass) is the most basic method of encoding. It reads through the file once, compresses each frame as it is loaded, and estimates the bit rate for each frame. The resulting file size is closely related to the value entered in the Limit Data Rate To text box, since the data rate can not vary on a frame-by-frame basis even if more or less data is needed.
Better (1 Pass VBR) is the same as Baseline but encodes using Variable Bitrate Encoding (VBR). VBR keeps the average bit rate at or below the target data rate specified for the video. This allows the data rate to fluctuate based on the content in the clip. If VBR can encode the frame with less data, it will. The resulting file looks similar to one created with the Baseline option, but the file size may be smaller.
Screen Recording Codec is for recording screen operations with a lossless compression. This compression optimizes content that depicts computer screens; for example, an instructional video that shows a pointer moving across a computer screen.When Screen Recording Codec is selected, Quality, Limit Data Rate To, and Motion Estimation are dimmed.
- For Frames per Second, enter a value or select a frame rate from the pop-up menu. To maintain the temporal quality of the original source clip, use the same frame rate as that of the original source. If you are dropping the frame rate to lower the data rate, the frames per second should be an evenly divisible number from the source frame rate (e.g., one-half or one-quarter the original rate). The pop-up menu next to the Frames per Second text box contains commonly used frame rates.
- For Limit Data Rate To, do one of the following:
- Select a preset Quality setting (Normal, Better, or Best) to automatically select a Limit Data Rate value. This value is determined by the output FLV file's resolution and frame rate. When you select Low, Medium, and High from this menu, the Limit Data Rate To text box updates to reflect the value chosen.
- Use the pop-up window to select a value for Kilobits/Sec.
- If you find that the preset quality settings are not working with your particular source footage, enter a higher data rate in the Limit Data Rate To text box.
- For Keyframe, enter a value to control the frequency of keyframes (frames with complete data) in the video clip. For example, for a keyframe interval of 30, Flash stores a complete frame every 30 frames in the clip. For frames between intervals, Flash stores only the data that changes from the preceding frame. A smaller interval stores more complete frames, resulting in a larger file size.
- For Motion Estimation, select Faster for faster encoding and lower video quality, or Best for slower encoding and better video quality.
- For Audio Encoding, select from the following options:
- Select Audio to export audio content with the video file. Deselect this option to export no audio with the file.
- Select Mono to export all audio content in one channel, or Stereo to export audio content in stereo.
- For Bitrate, specify the maximum bit rate at which the audio content will be transmitted. (Audio is encoded separately from the video content in the file and can have a different bit rate.)
- Under Other, do one of the following to resize the video:
- Select a preset image size from the pop-up menu.
- Specify values for Width and Height, in pixels.
- Specify a percentage of the original image size.
- Check Lock Aspect Ratio to keep the aspect ratio the same size as the original clip.
- For Deinterlacing, select None to apply no deinterlacing, Lower to deinterlace for NTSC format, or Upper to deinterlace for PAL format. This option allows you to choose whether to strip the Upper or Lower field from the interlaced source video file.
- Click OK.
- Select a location where the exported file will be saved, and click Save.


 To install the FLV Export plug-in: