Copy and paste keyframes in an animation
For the tire to look realistic as it bounces, it should compress slightly on each bounce. You can create this effect by transforming the shape of the tire in Frame 1 of the animation, and copying that frame in Frame 30.
- With the Selection tool, select Frame 1 of the TireAnim layer. Then press F6 to add a keyframe.
A new keyframe is added, and the playhead moves to Frame 2.
- Select Frame 1 of the TireAnim layer again.
 In the toolbar, select the Free Transform tool.
The tire is selected, and transform handles appear around it.
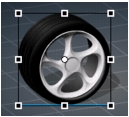
- Select the transformation center point (the small circle near the center of the movie clip) and drag it to the bottom of the tire.
The center point snaps to the lower middle transform handle.
- On the Stage, drag the upper middle transform handle down to slightly compress the tire shape.
If necessary, drag the tire to align it over the shadow. To view the positioning, drag the playhead over Frames 1 and 2.
- Right-click (Windows) or Control-click (Macintosh) Frame 1 of the TireAnim layer and select Copy Frames from the context menu.
- Select Frame 29 of the TireAnim layer, and then press F6 to insert a keyframe.
- In Frame 30 of the TireAnim layer, right-click (Windows) or Control-click (Macintosh) and select Paste Frames from the context menu.
- Select Control > Test Movie to view the animation.
- Close the SWF file window to return to the authoring environment.

